What if I said you could have your book up on Amazon and making money within 72 hours?
(Assuming you’ve already written the book, of course.)
Sounds a whole lot better than waiting months or even years to find an agent, get a book deal, and go to all the rigmarole of working with a publisher, right?
Amazon also lets you keep more of the money. A lot more.
The only problem?
It’s hard to figure out how to get started. That’s why I created this comprehensive, step-by-step guide to Kindle publishing, jam-packed with little nuggets of wisdom I’ve picked up along the way.
Let’s jump in…
Table of Contents
- You Can Make Money Self-Publishing Even if You Don’t Have 100K Subscribers Yet
- Before You Write Your Book — Validate Your Profitable Book Idea
- While Writing Your Book — Gather a Mob of Potential Book Buyers
- After Writing Your Book — Package Your Book Like a Best Seller
- Before Launching Your Book — Create a Rock-Solid Launch Plan
- Launching Your Book — Follow This Timeline for an Early Boost in Sales
- After Launching Your Book — Keep the Sales Going and Keep the Royalties Coming In
- The End Result?
- Play the Long Game and Build Your Self-Publishing Enterprise
You Don’t Need a Platform to Publish Your Book on Kindle
I only had 250 subscribers when I launched my first book. And even though I took a relatively passive role in promoting the book — I did a few promotions during launch to give me an early bump and then mostly counted on Amazon’s algorithm to drive sales — it earned its first $1,000 within five months.
That’s not a result worth bragging about, but it was enough to inspire me to write a second book and do much better. That meant I had to take a more active approach.
So I was much more strategic, grew my audience larger, and promoted the book a lot more. And this time around, I got to $1,000 within the first month.
Even better: The book went on to make over $10K in its first year, which was a big improvement from the first book, which made $2K in that same time span.
The lesson?
You can make money writing even if you have a tiny list, and even if you take a somewhat passive role in promotion. But the more active you are, the more money you’ll make.
So in this post, I’ll share the step-by-step strategy I used to publish and promote my second book. You’ll have to decide for yourself how much of it you’ll follow and how active a role you want to take.
Ready to dig in?
Before You Write Your Book — Validate Your Profitable Book Idea
Some book ideas are destined to fail before a single word is penned or typed, which is why you should validate your book idea first.
I can’t tell you how many times I’ve run across authors who write books about obscure topics for tiny audiences and are genuinely surprised when their sales are low.
Don’t be like those authors.
With the right research techniques, you can find a book idea that readers love and that you enjoy writing about.
Here’s how you do it.
Step #1: Take an Inventory of Your Interests
Personally, I already knew the book I wanted to write would be about self-reinvention. It was the idea that had been nagging at me for a while. So all I needed to do was validate whether it had selling potential.
But if you don’t have a concrete idea in mind yet, you can use the follow exercise to generate ideas. (If you do have an idea already, you can skip to Step 2.)
- What do you find easy that others find difficult?
- If you could only choose one section in a bookstore to read, which section would you choose?
- What seems obvious to you that isn’t apparent to others?
- What topic gets you talking to the point you won’t shut up about it?
- What do friends and family tell you you’re good at?
- What compliments have you received from strangers?
- What types of articles do you read online?
Once you complete your inventory, review it to look for patterns. Maybe you’re a great communicator, have excellent financial habits, or have a knack for motivating others. The traits, knowledge, and skills you possess can translate into topics for books.
Review the list and use your answers to come up with a few book ideas. You’ll use these for the next step.
Step #2: Spy on Your Competition
Like I said, I already had an idea for my book in mind, but I still needed to know whether it had selling potential. I didn’t want to spend a lot of time writing a book that nobody (besides my most devoted subscribers) would buy.
So, before I started writing, I validated my idea by researching the competition.
You can do that yourself by going to Amazon and answering these questions:
- Are there similar books? If you can’t find a book similar to yours in the marketplace it means you don’t have a good idea, because no one is that original.
- Can you compete? Checking the competitive landscape gives you an idea of how well your book can sell.
- Are there enough buyers? You want to make sure enough people want the type of book you plan on writing to make it worth your time.
You can find the answers to these questions in three steps:
A: Find Your Category on Amazon
First, you’ll need to find a suitable category for your book on Amazon.
Here’s how:
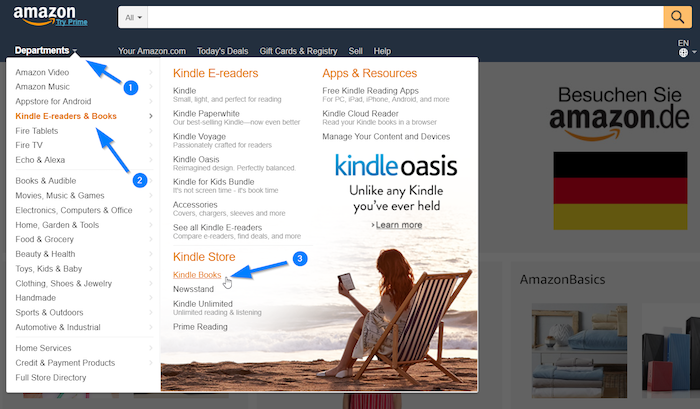
#1. Go to amazon.com and navigate to Departments > Kindle E-Readers & Books > Kindle Books.
#2. Click Best Sellers & More in the left-hand menu:

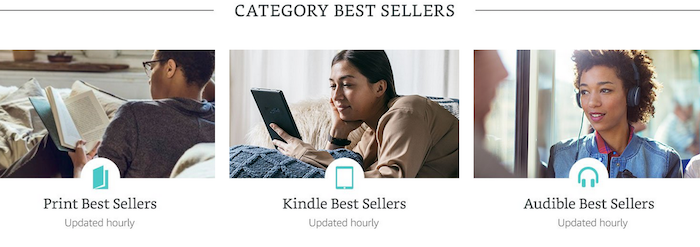
#3. Scroll down until you see the menu below and click Kindle Best Sellers.
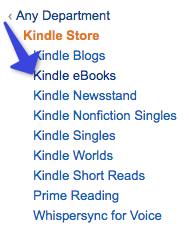
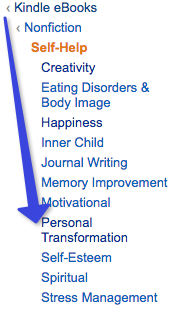
#4. Select Kindle eBooks from the left-hand menu.
#5. Pick a category and subcategory that fit closest to your book idea(s).
For my book on self-reinvention, I chose the category Self-Help and subcategory Personal Transformation.
Once you’ve picked a subcategory, you can check to see whether you can spot books in the top 20 with similar topics.
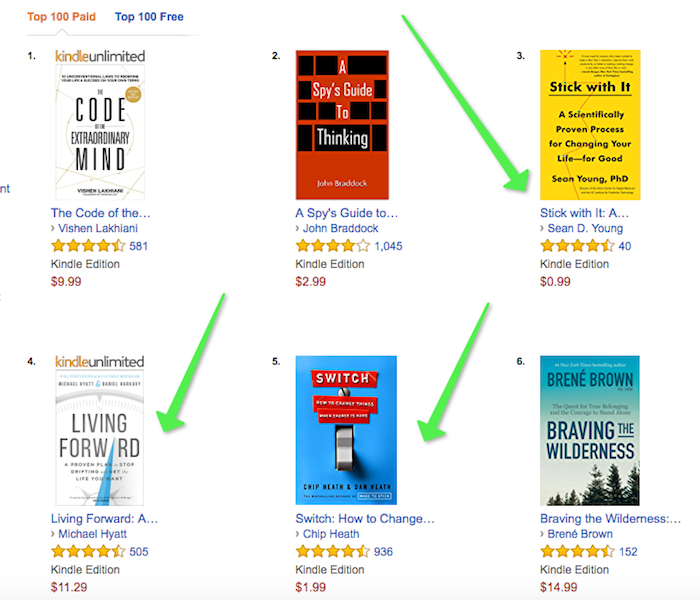
B: Check Your Category’s Top 20 Books for Similar Topics
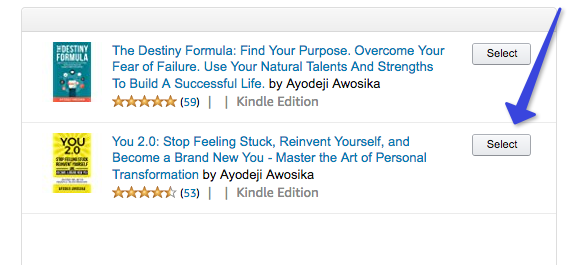
The premise for my book was self-reinvention. I didn’t need to find a book with the exact word “reinvention,” but I looked for books with similar themes like behavior change, personality change, and life change.
I found some books that were similar to mine (#3 and #5 below explicitly state they’re about change, while #4 is a book about improving your life in general).
At the end of this step, you’ve answered the first question. You’ll know whether there are similar books to your idea.
If there are, that’s good news! You can proceed to the next step which will answer the other two questions — can you compete, and are there enough buyers?
C: Check the Best Seller Rank of the Top Books in Your Category
If you want to know whether you can compete in a category and whether there are enough buyers, you need to know how well the books in your category sell.
You won’t find any actual sales numbers on Amazon, but through their Best Seller rank, you can get a decent estimate.
You can find a book’s Best Seller rank by scrolling down its product page. The rank will be listed under Product Details.
![]()
The higher the rank (with #1 being the highest), the more copies it sells — but also, the harder it will be to beat. You have to look for categories where the average bestseller rank is neither too low nor too high.
Here’s how it generally breaks down:
- Rankings above 1,000 will have great sales numbers but are very competitive.
- Rankings from 1,000 to 30,000 are less competitive, but will still have decent sales numbers.
- Rankings of 30,000 and lower are the least competitive, but will also have lower sales numbers.
As you can see, the sweet spot is in the middle. You don’t want a category that’s too competitive, nor do you want a category with low sales numbers.
Aim for categories where you think you can crack the top three books. If you follow the strategies laid out in this post, you should be able to reach the top three in categories with medium competition.
If you can get your book featured in the top three when you launch, you skyrocket the chance of your book being featured highly in the Hot New Releases list.
And if you appear high enough in that list, your book will get a lot of exposure. Amazon will feature your book in a highlighted section above other books that are similar to yours, like this:
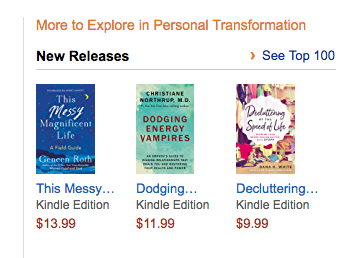
Also, people browse for books by categories, but they tend to skim through the category pages. The higher you are in a category, the higher the chance that someone will click through to buy your book.
So picking the right category is crucial. If you don’t think you can crack the top three books in your initial category, you might see if you could feature your book in an alternative category where the competition is less heavy.
Step# 3: Brainstorm a Whole Bunch of Titles
Now you’ve ensured your book idea has selling potential, so you’re about ready to start writing. But before you do, you should give your book a title.
What you have to know about book titles before you write yours is that they have two components: The main title and the subtitle.
When you’re brainstorming your main title, here’s what you want to keep in mind:
- It should be punchy and memorable.
- It should hint at the book’s topic.
- It should resonate with your audience.
When brainstorming your subtitle, you want it to clarify how your book helps your readers. Ask yourself:
- Which of my reader’s pain points will my book solve?
- What positive outcomes will the book provide?
- What kind of person will the reader be after reading your book? How will their life change?
For my book, I brainstormed 50 different main titles and 25 subtitles. They weren’t all fantastic, but that’s the point. When brainstorming titles, you just write down whatever comes to mind. Then you cross out the options that you don’t like, or that you like less, until you only have your favorites left.
To give you a glimpse of some ideas I had, here were some contenders for my main title:
- You 2.0
- The Life-Changing Magic of Starting Over
- The Power of Reinvention
And these were some favorites for my subtitle:
- Unlock the Secrets that Keep You Stuck and Reprogram Your Mind for Success
- Stop Feeling Stuck, Reinvent Yourself, and Become a Brand New You
- Redesign Your Life, Find Your Mental Blind Spots, and Master the Art of Personal Transformation
The final title became: You 2.0: Stop Feeling Stuck, Reinvent Yourself, and Become a Brand New You — Master the Art of Personal Transformation.
What’s your title going to be?
Once you decide, you know exactly what book you’re going to write. And having taken all the right steps, you can feel confident it will sell when you’re done.
While Writing Your Book — Gather a Mob of Potential Book Buyers
If you’re self-publishing books, you need an audience of potential book buyers. This will give you two critical advantages:
- You get an early boost in sales, and having a positive sales record encourages Amazon’s algorithm to promote your book for you.
- You can leverage your audience for reviews, which Amazon also uses as a ranking factor, and they’ll also help other people make the decision to buy.
If you don’t have anybody buying your book or leaving reviews as soon as you publish, the chances of it taking off are slim to none.
Now, as I mentioned earlier, that doesn’t mean you need 10,000 subscribers. But the more you have, the better.
My second book made more money than my first in large part because I took the time to gather new subscribers as I was writing it.
Here’s what I did to grow my audience larger for my second book:
Step #1: Create an Alluring Incentive For People to Join Your List
People rarely part with their email addresses for nothing in return, so you need to offer them an incentive to join your email list.
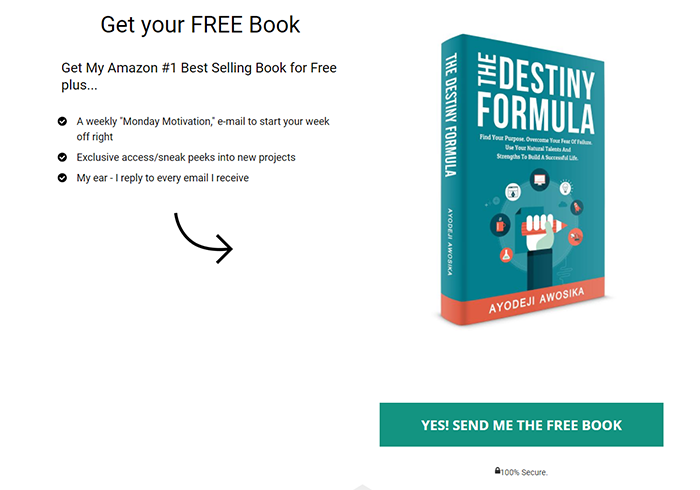
To be honest, I cheated a bit here, because I offered something that I already had available. I offered my first book The Destiny Formula.
Ideally, you want to offer an incentive that’s a perfect complement to the book you’re writing.
For example, if you were writing a book about the Paleo diet, you might offer one of these incentives:
- 5 Delicious Paleo Recipes You Can Make in 15 Minutes or Less
- 7-Day Paleo Quick-Start Email Course
- The Ultimate Paleo Snack List (Includes 250 Different Snacks)
Doing this ensures you build an audience that’s interested in your book’s topic.
My first book did have some audience overlap with my second, though, so it worked out in the end. And I did change my incentive when we got closer to my book launch. (We’ll get to that later.)
But if I had to start the launch over today, I’d have created something more relevant to self-reinvention from the start. It might’ve boosted sales even more.
Step #2: Set Up a Landing Page for Collecting Email Addresses
If you want to build your email list, you need two things: an email marketing platform to store your list and a landing page where people can sign up to your list.
Now, you have a number of choices when it comes to email marketing platforms, but these are three popular ones:
Personally, I opted for ConvertKit because they built it specifically for professional bloggers. It comes with easy segmentation features that let you promote your book in a more targeted way. I highly recommend it, but any of these platforms will work.
Once you’ve set up your email marketing platform, you can create a landing page to capture people’s email addresses.
I used Leadpages to do so, which makes it simple to create landing pages. It comes with ready-made templates that you can modify with its drag-and-drop builder.
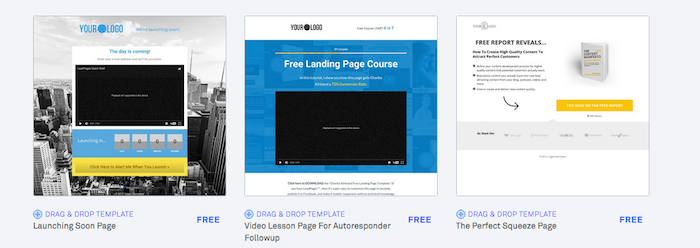
You can choose one of their templates and customize it to your wishes.
Here’s a screenshot of the landing page I created:
Once you have everything in place, all you need to do is send traffic to your landing page.
Step #3: Drive Traffic to Your Landing Page
My personal goal was to hit 3,000 subscribers before I published my book. My main strategy for reaching that number was publishing articles on Medium, each with a link back to my landing page.
Every article I published on Medium would include this offer at the end:

But I didn’t stop there. I also guest posted on Huffington Post, Thrive Global, Addicted2Success, Thought Catalog, The Pursuit and more.
While I got most of my traffic from Medium, publishing on these sites still grew my subscriber base by a significant chunk.
Between publishing on Medium and guest posting on these sites, I reached my goal of 3,000 subscribers within six months.
You don’t need to hit that same number of subscribers, but I do recommend you build your list to at least 1,000 before launching your book.
Publish new articles on a steady schedule and keep your new subscribers engaged while you finish writing your book. Once you do, you’re ready to jump into the next stage.
After Writing Your Book — Package Your Book Like a Best Seller
You can write the most amazing book on earth, but if you don’t package it in an appealing way, few people will read it.
After all, the prestigious title is best-selling author, not best-writing author.
In this section, we’ll cover three important steps to packaging your book:
- The cover design
- The formatting
- The book description
Ready to go?
Step #1: Get a Cover That Grabs Attention
I cannot stress the importance of this step enough. You need a good cover for your book, or it won’t sell.
The cover gives potential buyers their first impression of your book. If it looks cheap and sloppy, they’ll assume it’s not worth their money.
A good book cover has, at the very least, the following characteristics:
- A clear, legible title. Most of your potential buyers will see your cover as a thumbnail first, so your title should be easy to read when shrunken to that size. Avoid small, hard-to-read letters and scribbly fonts.
- A design that stands out. Whether it stands out through a bold color or an interesting graphic, you want your cover to catch the eye.
Now, if you’re tempted to design your own cover, I have one word of advice: Don’t.
Unless you’re a professional cover designer, you’re better off handing this responsibility over to someone else. This is not something you want to pinch pennies on.
Personally, I hired Happy Self Publishing to create my cover. They kept coming up in communities of writers over time, so I gave them a try. I was not disappointed. They struck a good balance of professionalism, quality, and price.
Note: If you’re on a super-tight budget, you might also try Fiverr. In that case, you have to know what you’re looking for. You have to check the designers’ samples and make sure their covers look professional. You’ll likely get better quality covers elsewhere, though.
When I hired Happy Self-Publishing, they asked if I had ideas for my cover and sent me a questionnaire to gather my book information (title, subtitle, description, etc.) and my preferences for the cover design (preferred colors, fonts, etc.).
They gave me questions like this:
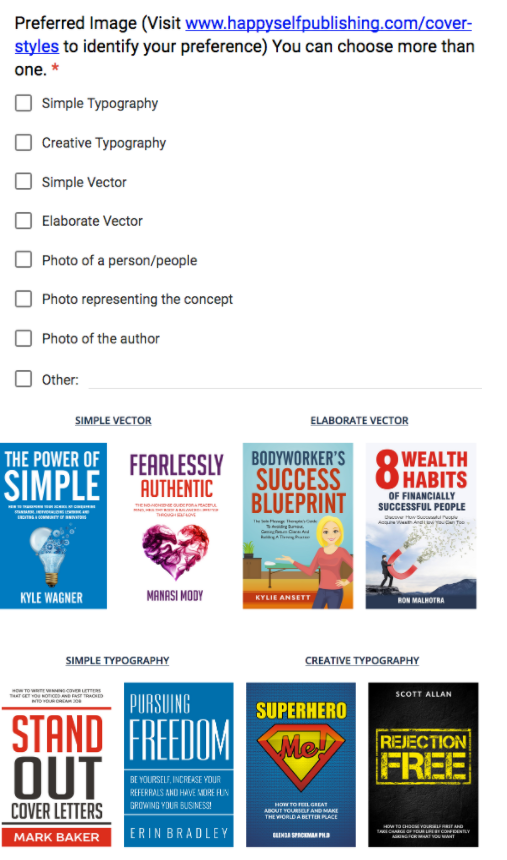
I filled out the questionnaire, gave the designer my directions, and also sent samples of covers I liked to give him an even better picture of my tastes.
Within days, he came back with several mock-ups.
We went through several rounds where I told him what I liked and disliked, and he’d send me new mock-ups based on my (and my audience’s) feedback, until we finally settled on my final cover.
Here’s how my cover evolved over time:
Step #2: Make Your Book Look Pretty Inside
In addition to your cover, you also need to make the inside of your book look good. If all the text is mushed together, it’s full of syntax errors, or it’s written in a terrible font, people won’t want to read your book.
To prevent this, you need to format your book — specifically, you need to format and save your book in a Kindle-friendly file-type like .mobi or .epub.
Now, you can do this yourself, or you can hire a professional to do it for you.
I formatted my book myself using an easy-to-use piece of software called Vellum, which uses a simple WYSIWYG editor (“What You See Is What You Get” — the same editor in Microsoft Word and WordPress). You can just copy and paste your chapters into it, change the formatting however you like, and export.
The only problem? Vellum is only available on Mac.
If you’re on a PC, you have alternative options like Reedsy and Book Design Templates.
A do-it-yourself approach will save you some money, but if you feel you’re not very tech-savvy and want to make sure the book is formatted properly, hire someone. Happy Self-Publishing, the company I used for my cover, also provides an affordable formatting service, or you can find hundreds of freelancers on Upwork who can do it for you.
When the formatting is done, though, don’t forget to proofread the book with a Kindle or the Kindle app. Make sure there are no formatting bugs that need to be fixed.
After that, you’re done with this step.
Step #3: Write a Description That Sells Your Book for You
When your cover lures people to your Amazon sales page, the next thing they’ll do is read your book description. They’ll want to know exactly what your book is about and how it’ll benefit them.
If your description has weak writing, it won’t be compelling enough for them to click the buy button, so they’ll click the back button instead.
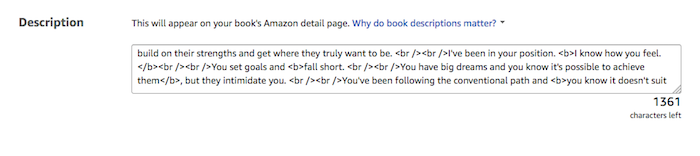
Now, the key thing to understand when writing your book description is that you should not treat it as a summary of your book. Rather, you should treat it as a sales letter. It shouldn’t just inform potential buyers of the contents of your book, it should persuade them to buy.
Here’s mine, for example:

See how I focus the description on benefits to the reader? See how I use the bullet points to foster curiosity rather than give away the main points of the book? These are basic sales letter techniques you should use in your description.
Imagine if the second bullet had read, “Goal setting doesn’t work because [reason].”
Giving the reason away would defeat the need for the reader to purchase the book. Instead, I trigger curiosity by leaving it open.
If you want to learn more about writing persuasive descriptions, the following resources helped me a lot while writing mine:
- How I Wrote the Book Description for a Famous Book
- 6 Steps to a Perfect Book Description That Sells a Ton of Books
- How to Write a Book Description That Sells
Before Launching Your Book — Create a Rock-Solid Launch Plan
Your launch makes or breaks the success of your book.
You shouldn’t wait until the week of your launch before you start planning it. Instead, you want to have a plan in place and have your marketing materials prepared well before you hit publish.
Here are a few things you should do to prepare for the launch of my book.
Step #1: Create Your “Street Team”
Before your launch, you should assemble a so-called “street team” to help write reviews for your book and help promote it during launch week.
I reached out to people in my network — fellow authors and bloggers I’d met over the years — and asked them to join.
If you don’t have a well-established network, you can leverage your email list, like Kevin Kruse (a New York Times bestselling author) explains in this video:
When you reach out to people in your network, explain what’s expected of them as your street team members:
- Explain they are to read an advanced reader copy of the book and prepare a review to post at the beginning of the launch.
- Encourage them to share the book on social media or with their email lists. Explain this is optional, but you’d be very grateful.
For the number of reviews you want, double that number of people on your street team, because chances are only half of them will actually review your book. At minimum, aim for 25 reviews, so 50 people for your launch team.
Step #2: Start Teasing Your Book to Your List
Once you’ve written your book and you can see your launch on the horizon, you want to gently tease your subscribers so they know it’s coming. You need to build anticipation.
Up to this point, I had been keeping my list engaged by sending Monday Motivation emails every week, as well as an update every time I published a new blog post.
As I was preparing for launch, I added teasers at the end of my emails, like this:
P.S. I’m finished with my new book, You 2.0.: Stop Feeling Stuck, Reinvent Yourself, and Become a Brand New You.
It details everything I’ve learned in the process of transforming my life from broke, addicted, and depressed to finding my passion, tripling my income, and succeeding. I’m really excited about it. Stay tuned.
You don’t have to sell it hard at this point. Just make them aware the book is coming.
Step #3: Map Out Your Launch Plan and Prepare Promotional Materials
You should never be winging it when you launch a book. If you’re smart, you’ll plan every single step you’ll take leading up to the launch, as well as afterwards.
You need to create a schedule so you know exactly which promotion happens when, and what actions you should take each day. (I’ll share my own promotion timeline in the next section, which you can emulate.)
Once you have planned everything, the next step is to prepare everything.
In the weeks leading up to my launch, I prepared:
- The email sequence promoting the book to my subscribers
- The emails I’d send to my street team
- 30 days’ worth of promotional articles that I’d publish on Medium
- Social media posts to promote the book
For the promotional articles, I also prepared a few new incentives more geared toward promoting the book than my original one:

When you don’t prepare for your launch beforehand, you will feel frazzled and frustrated throughout the launch. You’ll be scrambling to promote the book instead of having a strategy that makes you feel confident the book will sell.
Plan ahead, and you’ll launch with a bang.
Launching Your Book — Follow This Timeline for an Early Boost in Sales
You may think your book launch happens when you publish your book on Amazon and put it up for sale.
And you’re not wrong. Technically, that is when you officially launch your book. But the launch process is a bit more involved than just clicking a publish button, and it starts much earlier than your official launch.
It starts from your first big promotion, as that’s when you start selling your book.
Below, you’ll find the timeline I used when launching my book. Feel free to emulate it.
Step #1: Send “Free Sample” Emails (Launch Minus 4 Weeks)
Four weeks ahead of your official launch, you want to send your subscribers free samples. Send them one free sample each week.
This will give them a taste of what’s inside.
I sent my own subscribers the introduction to my book, Chapter One and Chapter Two.
Of course, you don’t have to use your first chapters. You can choose to share any chapter you wish. Share the ones you think will make your readers hungry for more.
Hey friend,
The launch date for my new book, You 2.0: Stop Feeling Stuck, Reinvent Yourself, and Become a Brand New You, is just around the corner.
I put my heart and soul into writing this book and I wanted to share some of it with you today because I’m confident reading some of it will inspire you to want to read the whole thing to transform your life.
As follows is the introduction to the book:
[Book Intro Goes Here]
In the next week or so, I’ll share even more sections of the book. Why? Because my primary goal is to get you to read the book and use it to change your life. That matters to me more than money.
Keep an eye on your inbox 😉
Step #2: Publish Your Book on Amazon (Launch Minus 1 Week)
You should never wait until your official launch date to publish your book on Amazon. You should publish it one week in advance.
This way, you can ask your street team for early reviews.
These early reviews are important, as you’ll need to have at least 10 reviews if you want to use book promotion sites during launch week. (And you do, as they can give you a huge surge in early sales. We’ll get to them later.)
To publish your book on Amazon, you need to create an account on Amazon Kindle Direct Publishing.
Then follow these steps to publish your book:
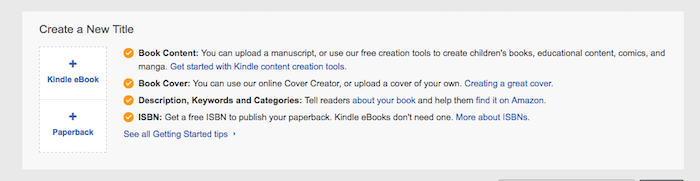
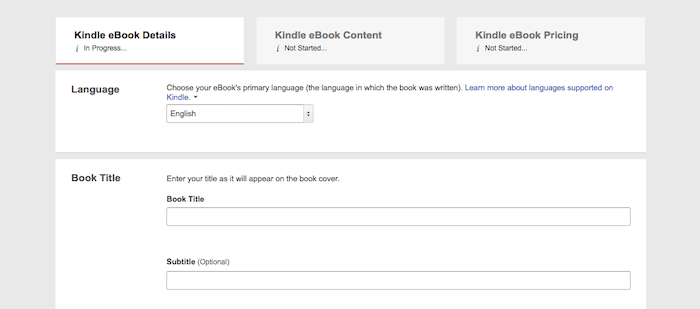
#1. Go to “Create a New Title” and click “+ Kindle eBook”.
#2. Enter all necessary book information (language, title, subtitle, etc.).
#3. Enter your book description. (You can use HTML tags to change the way the content appears on your book page.)
#4. Choose keywords.
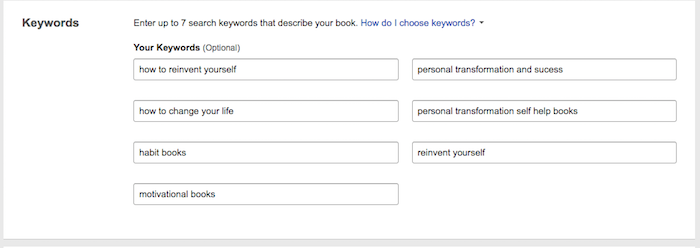
Amazon allows you to use up to seven keywords to help readers find your books. You want to match your keywords with the terms readers will type into the search box.
To find good keywords, you can:
- Search keywords manually. Check this detailed guide if you don’t know how.
- Use keyword tools such as Kindle Spy, Merchant Words and KDP Rocket that provide data on how many people search certain keywords.
- Use names of popular authors and books. You can associate your name with top books to siphon some of the traffic that goes to their names.
Here are the keyword I chose for my book:
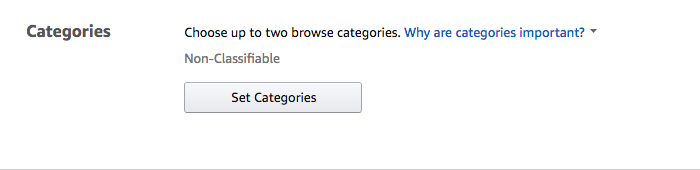
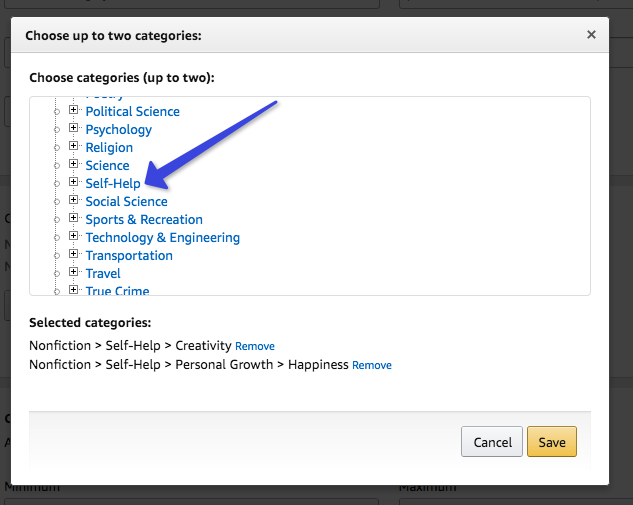
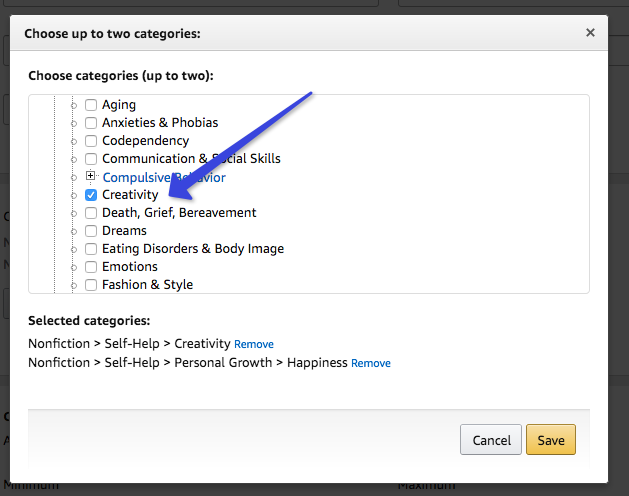
#5. Choose your categories.
Initially, you’re only allowed to choose two category/subcategory combinations from the list Amazon provides, but strangely, their list doesn’t include all their categories. You’ll find a lot of the more niche categories are missing. (You’ll have a hard time trying to crack the top three in most of the broader categories.)
For now though, just pick two categories/subcategories that your book fits into:
After you publish your book, browse books that are similar to yours and see which categories they are in. Then contact Amazon and request to have your book added to them.
In fact, if you’re smart, you can follow this process to be added to TEN categories, rather than just two.
Here’s a video from Kindlepreneur’s Dave Chesson that explains how to approach this:
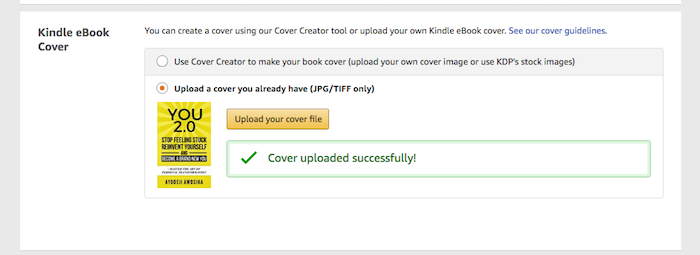
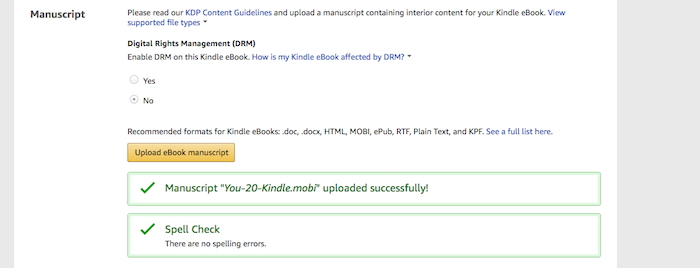
#6. Upload your cover and manuscript files.
#7. Enter pricing information.
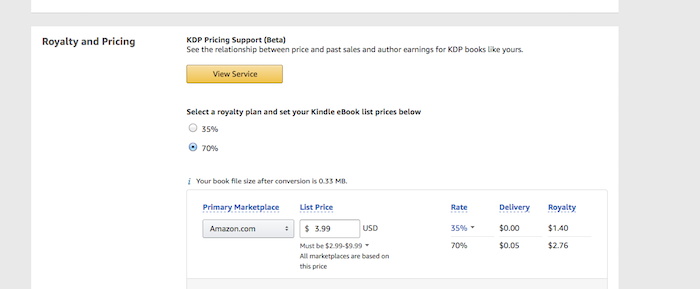
How should you price your book?
Before we get into that, you need to understand Amazon’s pricing and royalty model:
- For Kindle books priced from $0.99 to $2.98, you receive a 35% royalty on each sale.
- For Kindle books priced from $2.99 to $9.99, you receive a 70% royalty on each sale.
- For Kindle books priced above $9.99, you receive a 35% royalty on each sale.
Now, you might think that pricing your book somewhere between $2.99 and $9.99 is the obvious way to go, as that will get you the most royalties.
But for starters, I priced my book at $0.99 and I suggest you do the same.
That would earn you $0.35 per sale, which doesn’t seem like a lot … because it isn’t. The point of this isn’t to make a lot of money early, but to get a lot of sales early.
Amazon doesn’t look at the price of your book to determine how well it’s selling. It looks at the number of copies sold. If you can sell a ton of 99-cent copies in the beginning, you’ll benefit from some algorithmic momentum even after you raise the price.
When you price the book at $0.99, you can use promotional sites to get your book in front of massive audiences during launch, and you give your subscribers an incentive to purchase early (before you raise the price).
#8. Scroll down and click Publish Your Kindle eBook.
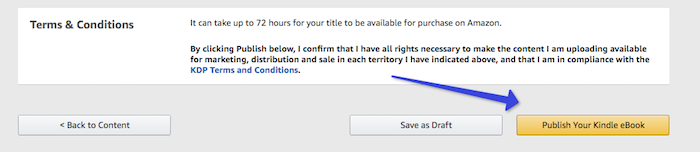
Once you’ve clicked to publish your book, it will appear on Amazon in 24 to 48 hours.
Step #3: Ask Your Street Team for Reviews (Launch Minus 6 Days)
The moment your book goes live, you should send an email to your street team asking them to leave their reviews.
And this is important: You should ask them to download the book from Amazon first, and then write their reviews. If they don’t do it in this order, their reviews won’t be verified. They will still show up, but Amazon won’t give them as much weight.
If you’d rather not ask them to pay $0.99 in order to leave a review, you can enroll in KDP Select and run a free promotion for 72 hours. That way, they can “purchase” the book for free, and Amazon should still mark their reviews as verified.
Step #4: Schedule Promotions (Launch Minus 5 Days)
I mentioned book promotion sites earlier. So what are they, exactly?
Basically, they’re sites that promote books while they’re free or priced at $0.99. These sites have massive lists of subscribers who love reading books, and they’ll all receive an email that links to your book.
These readers can give you a gigantic boost in early sales.
Here are the sites I used myself, along with the cost to use each:
- Buck Books — $29
- Books Butterfly — $40
- Robin Reads — $55
- James Mayfield — $10
- Fussy Librarian — $30
I found these sites from a list compiled by Dave Chesson at Kindlepreneur.
Now, considering you’ll only make $0.35 per sale, you won’t make much profit from the use of these promotional sites. You might even lose some money. So why use them at all?
Because you want to create a track record of sales success.
Amazon will promote your book for you if it sees you have sales of your own. When authors make money, Amazon makes money, but like any good business, it won’t recommend products without profit potential.
You don’t have to use five services, like I did. But use at least three.
Step #5: Launch Your Book With a Bang
Alright, this is the moment you’ve been waiting for. It’s time to officially launch your book to the public.
During launch week, you should promote your book hard. Hopefully, you’ve done the work to prepare yourself so you’re not overwhelmed.
You should promote your book by:
- Sending a sales sequence to your email list. (Examples of each email will be given below.)
- Asking your street team to help promote the book on social media and/or to their email lists.
- Running book promotions you’ve set up. (You should have already scheduled these, as instructed in the previous step.)
- Promoting the book on social media. (I recommend using Buffer to schedule multiple social media posts per day.)
- Publishing content from your content marketing campaign.
Here’s how I scheduled these activities during launch week:
Day 1:
- Send an announcement email (See example #1 below).
- Ask your street team to promote your book on social media (or their email lists).
- Publish promotional content on Medium.
Day 2:
- Send a soft-sell email. (See example #2 below.)
- Run 10 social media posts.
Day 3:
- Run your first book marketing promotion (Buck Books).
- Run 10 social media posts.
- Publish promotional content on Medium.
Day 4:
- Send another soft-sell email to your list.
- Send a reminder email to your street team for social media/email list promotion.
- Publish promotional content on Medium.
Day 5:
- Run your second book marketing promotion (James Mayfield & Books Butterfly).
- Run 10 social media posts.
- Publish promotional content on Medium.
Day 6:
- Send a hard-sell email to your list. (See example #3 below.)
- Run 10 social media posts.
- Publish promotional content on Medium.
Day 7:
- Run your third book marketing promotion (Fussy Librarian & Robin Reads).
- Send price change email. (See example #4 below.)
- Publish promotional content on Medium.
- Run 10 social media posts.
Here are some examples of each email in my sales sequence:
Do you wish life came with a “do over” button?
We all make mistakes. Time can pass quickly and we can come to a point where we ask ourselves, “How the hell did I end up here?”
If you’ve ever felt this way, my new book, You 2.0 — Stop Feeling Stuck, Reinvent Yourself, and Become a Brand New You, might provide the answers you’ve been looking for.
And it’s only 99 cents, a special price I’m revealing to subscribers only for the next 5 days.
I’m setting the price so low because I want you to read the book. At this point, I care about getting the book in as many hands as possible over making money.
Click here to learn more about the book.
Talk soon,
Ayodeji
Hey friend,
For the past few weeks, I’ve told you about my new book,You 2.0 — Stop Feeling Stuck, Reinvent Yourself, and Become a Brand New You, which is available for 99 cents for the next few days.
(To those who have bought already, thank you SO MUCH — the book is now #1 in its category!)
The book tells the story of how I transformed my life and how you can too. It doesn’t tell theories, it shows what I’ve actually done.
See, before I reached my dream of becoming an author, my life was headed in the wrong direction. I was addicted to drugs and alcohol, working a dead-end job, and had no hope in sight.
Then, I decided I didn’t want to live my life that way and went through a ton of trial and error to become who I am today. I’ve more than doubled my income, gotten rid of bad habits, and have done many of the things I used to only dream of doing.
In the book, you’ll learn:
- How to discover your passions (even if you have no clue what to do with your life)
- How to get over your past and change your self-image (even if you think it’s set in stone)
- How to find the motivation to change your circumstances (even if you’ve tried and failed before)
I try my best to share the message without the typical theme of most self-help books that are often judgmental and critical.
See, I don’t think you’re “too lazy to succeed” or “mediocre.” Life sucks sometimes, and we’re all doing what we can to cope with it. I wrote this book to share ideas to inspire you to change, not to shove inspiration down your throat.
So, I’m inviting you to check out the book at the price of 99 cents because I care about the message and want to spread it far and wide.
Click here to learn more about the book.
Talk soon,
Ayodeji
Hey friend,
For the past few days I’ve been telling you about my new book, You 2.0 — Stop Feeling Stuck, Reinvent Yourself, and Become a Brand New You.
Today, I wanted to share a few reasons why I’m promoting the book and why I think you should invest in yourself by purchasing it.
I think you should invest in the book because:
- At a minimum, you’re throwing 99 cents into the “fountain of karma.” I didn’t find prosperity in my life until I supported other artists and entrepreneurs.
- Books are a great investment in yourself. Take the years of my trial and error and use it to your advantage.
- You’re smart. Smart enough to know if I can help and smart enough to know if I’m genuinely interested in improving your life.
Click here to learn more about the book.
That’s it!
Talk soon,
Ayodeji
Hey friend,
Today’s the last day you can get my new book, You 2.0, for the low price of 99 cents. After that, the price goes up to $2.99 and it’ll only go higher from there.
Why the low price and continued promotion?
To get the message out there. I’m guessing you’re a part of this community because you’re looking for a change in your life and if I’m able to help you do that, it’s worth all the effort I put into writing the book.
Click here to learn more about the book.
Until next time,
Ayodeji
After Launching Your Book — Keep the Sales Going and Keep the Royalties Coming In
To make money writing, your book can’t be a flash in the pan, which means you have to continue promoting the book to keep the sales rolling in.
Like I mentioned earlier, you want to give the book a good start with a boost of early sales to benefit from Amazon’s algorithms. But you should keep your momentum going longer than the first week. You want to keep sales coming in with some consistency after that.
During the weeks following the launch, you should continue engaging your list and keep spreading the message about your book to new readers.
Here are a few things you should do:
Step #1: Raise Your Price Once Per Week (and Let Your Subscribers Know)
As mentioned earlier, I set the price for my book at $0.99 for the first week. If I kept sales going at this price, my royalties would continue to stay low. So after the first week, I raised the price to $2.99, then to $3.99, and finally to $4.99.
Every time I was about to raise the price, I sent my subscribers a price change email. This not only reminded casual readers to buy the book, but gave them an incentive to do so. If they didn’t get in on the low price that day, they’d miss out forever, and nobody likes missing out on a good deal.
Step #2: Keep Publishing Posts to Get People on Your List
After publishing your book, you should continue publishing articles with links back to your sign-up form. Every new subscriber is a new potential buyer.
Set up a welcoming autoresponder sequence that gives subscribers your incentive and then proceeds to sell your book. You can use the same (or a similar) sales sequence that you used for your launch.
I wrote a total of 30 posts for 30 days on Medium to promote the book, and this added 150 more sales during the first month of my launch.
Tip: You can use Amazon affiliate links to track how many readers from your list actually bought your book from the link you gave them.
Step #3: Create An Amazon Ad Campaign for Sales on AutoPilot
Amazon Marketing Services provides a “pay per click” advertising program for authors. I highly recommend you use it.
My ad campaigns made a significant difference because I could pay for views and I made a profit from buying readers’ attention.
Here’s how you can create your own ads:
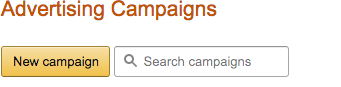
#1. Sign up for AMS through your Kindle dashboard by clicking Ad Campaigns in the top menu.

#2. Click new campaign.
#3. Choose Sponsored Product Ads.
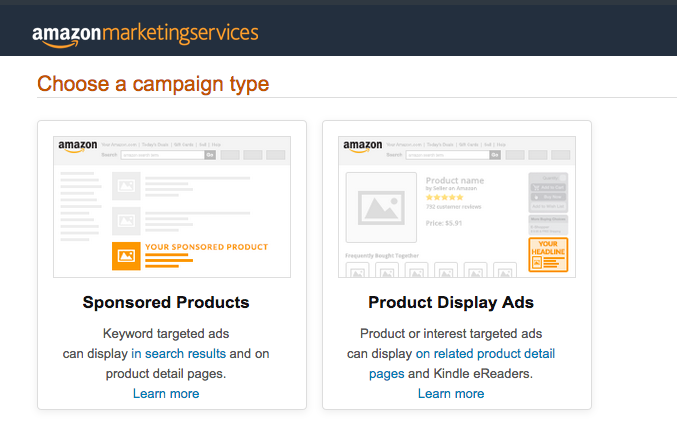
#4. Select the book you wish to advertise.
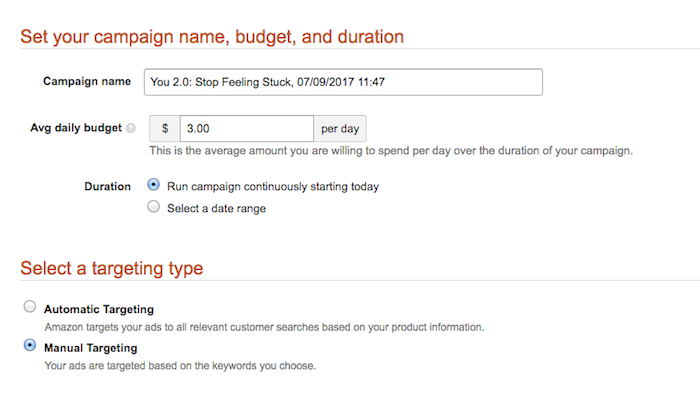
#5. Set your campaign name, budget, and select Manual Targeting.
To start with, $3–$5 per day is good because you can get useful data without breaking the bank. Less than $3 won’t give you enough data, and more than $5 can cause you to lose money if you’re not careful.
#6. Scroll down to the Add Keywords section and click Add Your Own Keywords.
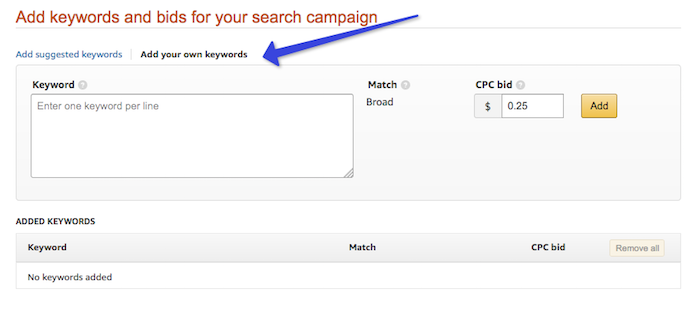
#7. Find relevant keywords.
You’ll need a lot more keywords for your ad campaign than you did earlier when you published your book.
But you can use similar techniques to find them:
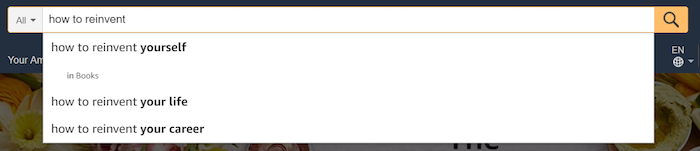
- Type relevant words and phrases into Amazon’s search bar and see which keywords Amazon suggests (as pictured below).
- Browse best seller categories and use popular book titles/author names as keywords.
- Use the “customers also bought” section of books from best seller categories to find related book titles/ authors to use as keywords.
- Download software. Kindle Spy and KDP Rocket are two tools that instantly provide relevant keywords for your book.
#8. Set the bid price for your keywords.
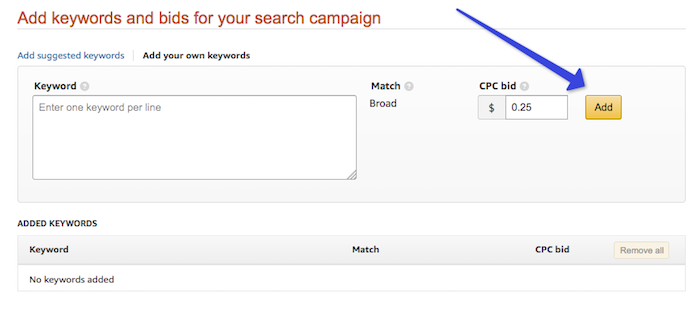
A bid price is the largest amount you’re willing to spend if someone clicks on your ad.
I added 1,000 keywords — the maximum amount allowed per ad — and set the bid at 10 cents. I didn’t want to spend too much money until I knew the type of results I’d get. If the ads worked well, I planned on increasing both my daily budget and keyword bids.
#9. Enter your ad’s marketing message.
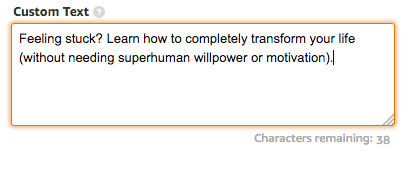
#10. Preview your ad and, if you like what you see, click Submit Campaign for Review.
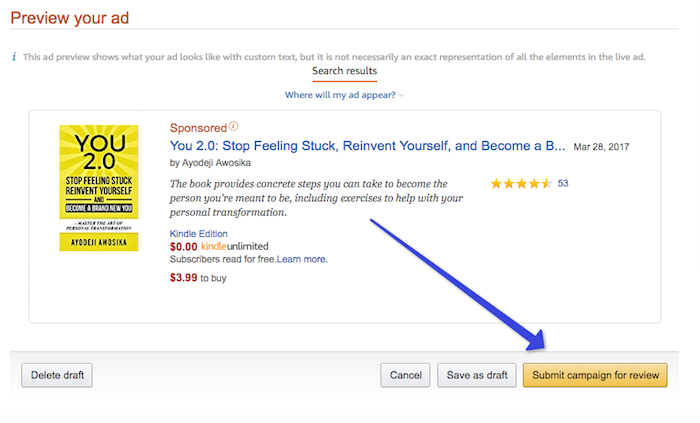
After 24–48 hours, your ad will be live (if it is approved, of course).
Step #4: Boost Your Winning Ads and Drop Your Losers
After publishing your ad, let it run for two week and analyze the data.
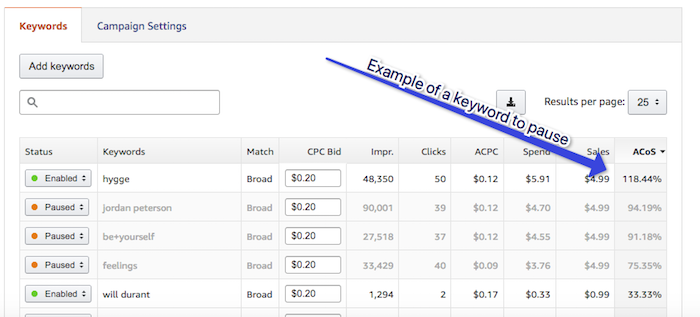
Here’s a screenshot of my ad dashboard:
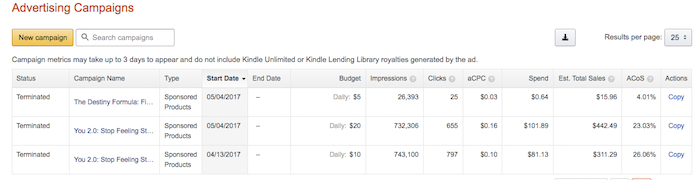
The key metrics you want to look at are:
- Impressions: The number of times people saw your ad.
- Clicks: The number of people who clicked on your ad.
- aCPC: The average cost per click on your ad.
- Spend: Total amount spent.
- ACOS: Average cost of each sale. If your ACOS is 25%, you spend 25 cents of every dollar you make. If it’s 75%, you spend 75 cents of every dollar you make. If it’s 125%, you spend $1.25, for every dollar you make, which means your ad costs more than it makes.
You can click into the campaign itself to see these same metrics for individual keywords. You can use those metrics to adjust your campaign.
For instance, when you see a specific keyword is costing you more than it earns, you can pause that keyword, and your ad won’t show up again.
Once you see how your keywords are performing, you can expand your campaign reach in the following ways:
- Increase your bids. Once I saw my campaigns doing well, I increased the bids of keywords to 20 cents, then 30 cents, and eventually went as high as 50 cents per keyword.
- Add more keywords. The more keywords you have, the more opportunity for new sales. I started an additional campaign with 1,000 more keywords.
- Increase total spend. If you find your daily budget is being spent quickly, raise it. I raised my spend from $5 to $10 to $15, and then to $20. As long as my ads turn a profit, I will keep investing in them.
The End Result?
So how exactly did my second book do? What are the numbers?
The final tallies for the end of the first month were:
- 877 ebook copies sold
- 37 print copies sold
- $1,237 in sales
The book has been out since April 2017 and has now sold approximately $10,000 in all formats combined (I added a paperback and an audio version, which I highly recommend you do as well).
After the initial launch month, I continued to promote the book through content marketing.
Anyone who subscribes to my email list goes through an email series that includes a few educational emails and a hard-sell email to buy the book. I publish one blog post per week to send new traffic to my email list and promote the book.
I’m continuing to run and scale my ad campaigns. I’ve spent more than $1,500 on ads so far and earned $4,955.50 to date from those ads.
That’s a solid return on my investment, if you ask me.
The first 90 days after launch accounted for a large portion of book sales. After that, sales remained consistent at around $500–$700 per month.
Play the Long Game and Build Your Self-Publishing Enterprise
I’m working on my next book right now.
With an even larger audience than I had when I launched my last book, my goal is to sell at least 10,000 copies of my third book within the first year.
What’s next? I’ll write another book, and another, and another. I’m building a body of work, and with each new book, I’ll continue to build my audience and my income.
When you build a body of work, you reap the benefits of having multiple assets. When a new reader discovers one of your books and likes it, odds are they’ll want to read your other books.
When you have multiple books for sale you can market them in unique ways like creating book bundles and offering deals on each book at different times.
Over time, you’ll improve your writing skills, you’ll grow a fan base which loves your work, and (if you do it right) you’ll make more money with each book you publish.
I love writing. I’d do it (and have done it) for free. But I want to make an impact and an income. Self-publishing provided a route for me to do both.
It can do so for you, too.
The post Kindle Publishing for Beginners: How to Make Your First $1,000 on Amazon appeared first on Smart Blogger.
from
https://smartblogger.com/kindle-publishing/
No comments:
Post a Comment