from
https://www.marketingprofs.com/articles/2018/33850/five-steps-to-using-employee-advocacy-to-drive-brand-engagement

So. You want to start coaching.
Why wouldn’t you?!?
You get one-on-one insights from your audience that you can use to make your blog more interesting, and you can make some money without creating an entire e-course from scratch.
Offering coaching on your blog is a smart business decision.
But how do you do it?
Like, how do you collect payment? Or get people to schedule a call time without sending 15 back-and-forth “when is good for you” emails?
And when you do get people on the phone, what do you say?
Today we’re going to walk you through all of that:
This is where the rubber meets the road—and if you stick to it, where your blog meets everything you’ve ever wanted it to have: dedicated readers, profit, and influencer status.
Sounds good, right?
So without further ado, here’s how to start your own coaching business:
The best way to get readers to want to hire you as a coach is to give them something to look forward to as a result of your session. Yes, “coaching” means they’ll get to talk to you and pick your brain, but most readers will want a little more than that.
So to create your first offer, start with the end result someone will get after coaching with you.
Are you a business coach who will help them decide on their pricing? Are you a web designer who can give them ten ways to optimize their website conversions?
Decide on an outcome that will be for the benefit of the reader, and build an offer around that.
Here’s an outline to help you:
For example, one of my “coaching” offers is called an “On-Site Copy Teardown.” During the one-hour call, I walk people through their website copy and review any on-site data with them. We find ways to improve their copy so they can get more conversions instantly, without a page redesign.
**rubs palms together vigorously**
All right, let’s get you set up to advertise, book, get paid for, and deliver your first coaching sessions. We’ll cover:
It’s a lot of little of steps, but it’s something you can tackle in one afternoon.
Note: I’ll be showing you a free way to get everything set up, but you can easily use a service like SimplyBook.me which is relatively inexpensive and makes setup and booking even more streamlined. Also, I’m using WordPress, but most of this can still be applied if you use another content management system.
When someone buys your coaching offer, two things need to happen:
For the first, you need to have an e-commerce platform. And for the second, you need a payment processor like Paypal or Stripe.
For the e-commerce platform, we’ll use Payhip.
I use Payhip to deliver some miniature e-courses that I sell because it specializes in digital downloads, but I’ve also used it as a free way to sell one-hour Copy Teardowns and 30-minute Copy Review Sessions to my students.
First, go to Payhip and sign up for a free account:
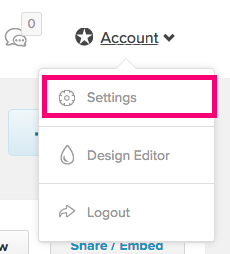
After you log in, click on “Account” in the upper left-hand corner, then click on “Settings.”
Click on the “Payment Details” tab, and you’ll see a prompt to connect either your PayPal account or your Stripe account.
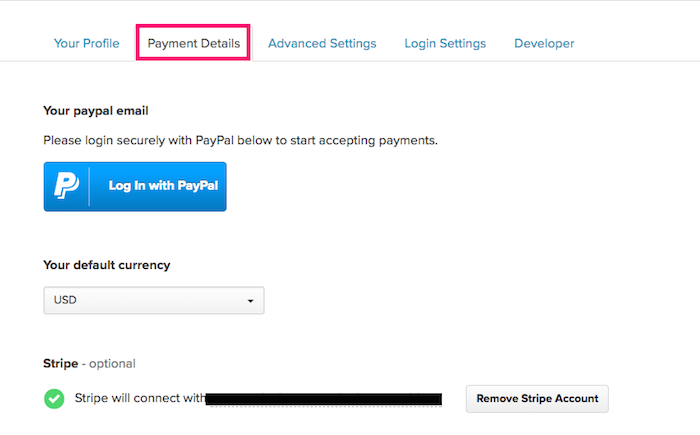
You can use PayPal (or PayPal and Stripe) if you like, but I prefer Stripe because it makes credit card payments much easier simply because that’s the only option. People don’t get confused with the additional options of paying with a PayPal balance or hooking up their bank accounts to send an e-check, like PayPal sometimes presents.
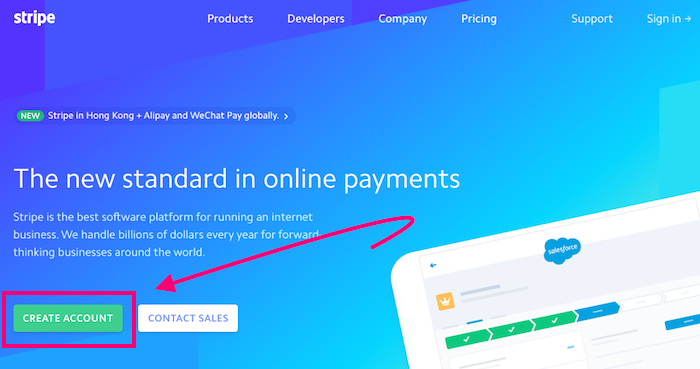
Stripe’s got a super-easy-to-follow setup process. If you don’t have an account yet, go to Stripe’s home page and click the “Create Account” button, and you’ll be ready to go before you know it.
Now that you’ve got a way to collect payment from people, you need a way for them to book coaching sessions with you.
For which Calendly is perfect.
First, go to Calendly’s home page and click on one of the “Sign Up” buttons to register for a free account.
After signing in, choose Event Types in the main menu bar. Choose whether you want to open 15-minute sessions, 30-minute sessions, or 60-minute sessions by clicking the “on” switch in the appropriate event type box.
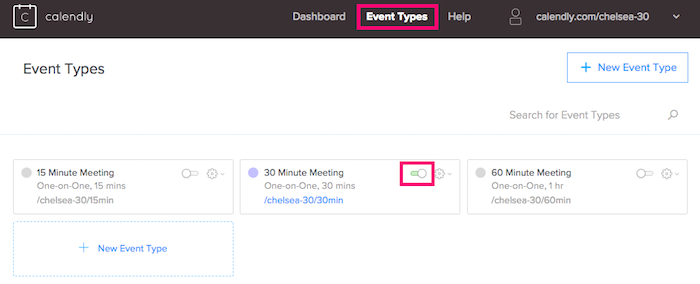
Then, click in the center of the event type box to edit the options for it.

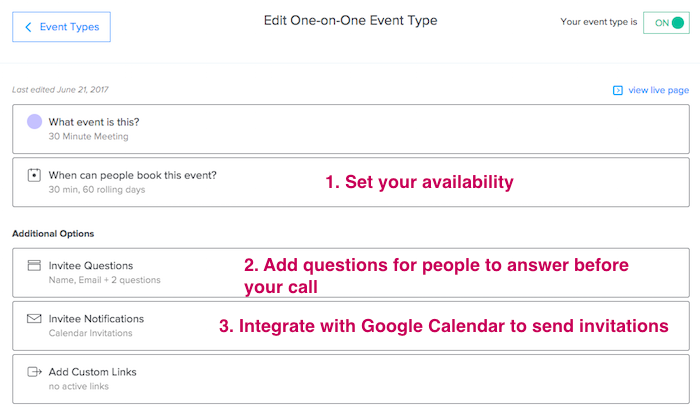
First, select which times you are available for coaching sessions.
Then, in “Invitee Questions,” add any questions you want people to answer before the call. (You might also ask for their Skype username here, or their phone-number if you plan to call by phone.)
And finally, integrate with Google Calendar to add the booking to your calendar and to have an invitation sent to both of you.
Now we’re going to create the “product” that you’ll sell.
And yes, you’ll technically be selling a coaching session rather than a digital download, but in order to use Payhip, you will need a digital “deliverable” that people will download instantly after purchase.
My download is nothing more than a PDF instruction sheet on how to schedule the coaching session they’ve just paid for, and instructions on what to do in the booking process.
Here’s what it looks like:
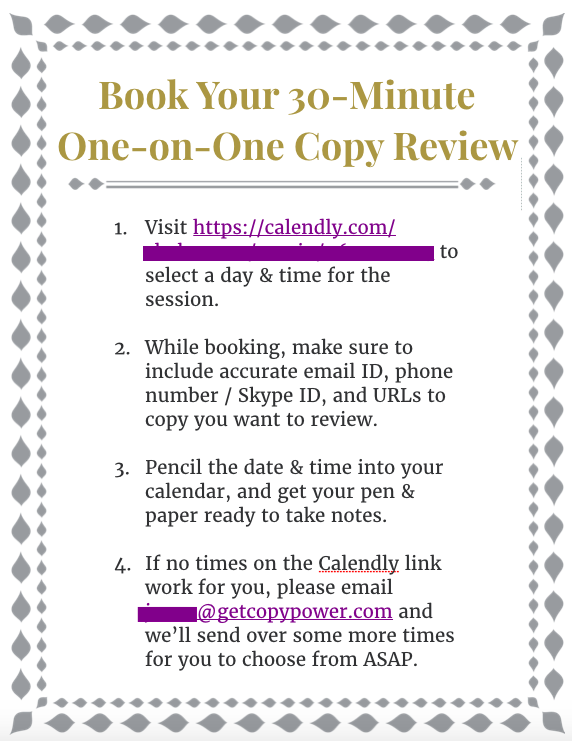
Very simple and straightforward, but it gets the job done.
The important part, though, is to make sure this document includes a link to your Calendly page so that people can book sessions with you. After that, include any other instructions you feel are necessary based on the coaching offer you’ve set up.
Then, go to your main Payhip dashboard, and click on the “Add new product” button:

Upload your PDF, give it a title, and set your price.
PayHip will also ask you for a cover image. If you have a blog logo, you could simply use that. Otherwise, Canva lets you create simple but good-looking graphics that are more specific to your offer.
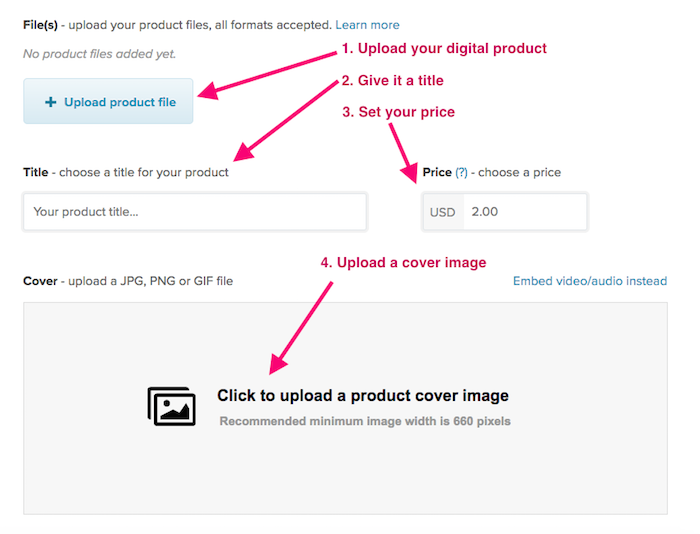
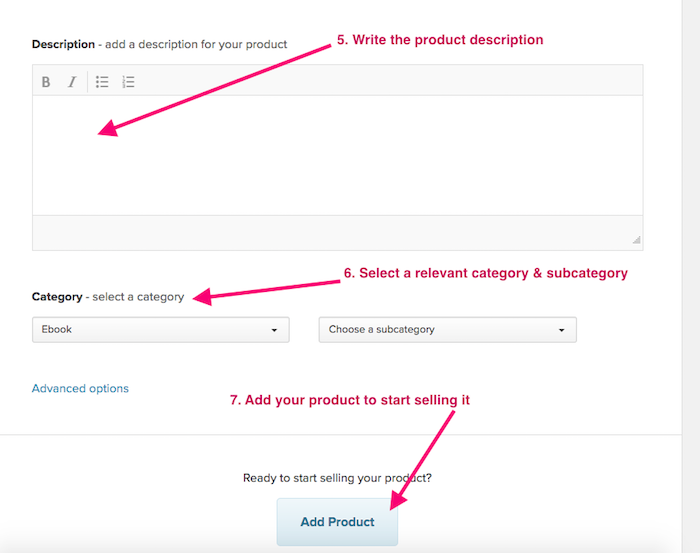
Then you’ll need to add a product description. Most people who get to this page will come from your website or email list and already know what they’re buying. But this is a great place to reiterate the benefits of what you’re offering and what’s involved in your offer.
After that, all you have to do is select a relevant category and click “Add Product.”
And you’re done! You offer is officially for sale!
Phew. Almost there.
All you need now is a sales page so people can actually find your offer and buy a session with you.
Ideally, you want to create a distraction-free page for this. (Meaning no menu, no sidebar, and no buttons that lead to anything other than your coaching offer.) This gives page visitors two options: buy or leave.
Fortunately, many WordPress themes come with a distraction-free landing page template. (You’ll have to check and make sure, especially if you’re using a free theme.)
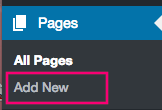
Go to your WordPress dashboard, find Pages in your left-hand menu, and click on Add New.
On the right-hand side of your content editor, look for a widget called Post Attributes and see if it offers a landing page template.
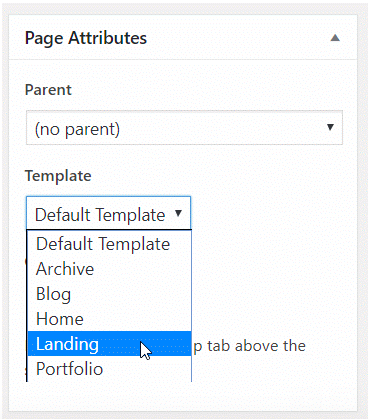
Google [name of your theme] “landing page” to find out. But if you discover your theme doesn’t have a landing page option, don’t worry.
You can try an online app like Leadpages or a plugin like Thrive Architect to help you build and publish the landing page. (Yes, they cost money, but they also have pre-built templates that have been tested for high conversion rates.)
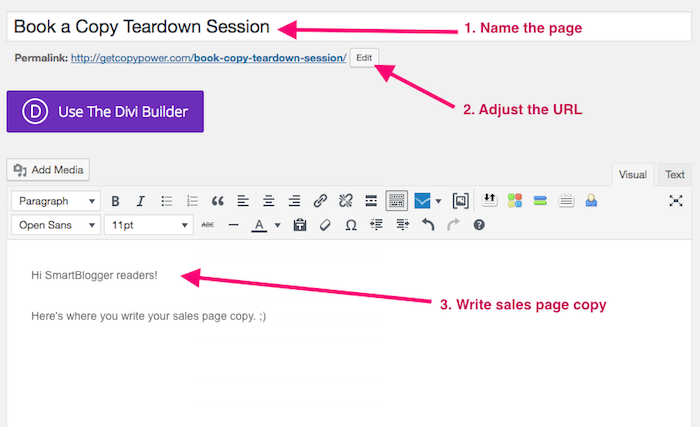
Now that you’ve set up your page as a landing page, give it a name, adjust the URL if needed, and add your sales copy.
And once the sales copy is written, of course, you need to add the buy button.
To get the code for this, go back to your Payhip dashboard and click on the Share/Embed button that appears next to your product listing:

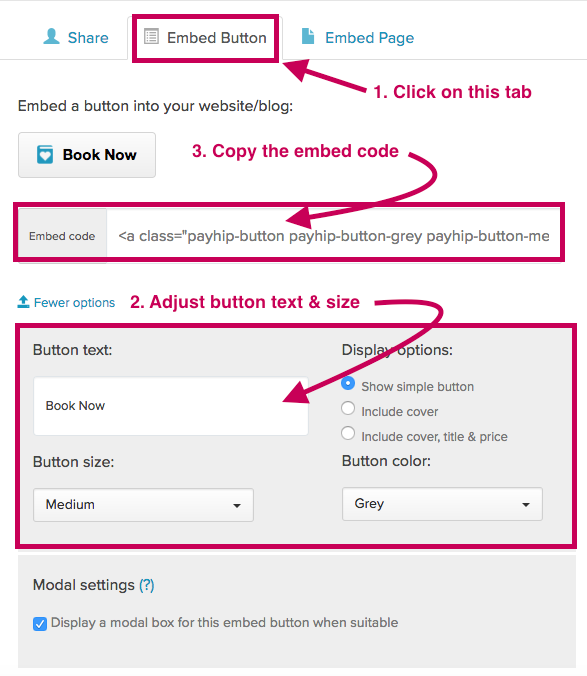
A window will pop up, and you’ll click on the “Embed Button” tab in that window.
You’ll see the embed code right away, but before you copy it, click on the “More Options” text below the embed code.
This drops down an entire menu of settings where you can adjust the button text, the size, and the display options until it all looks the way you want it to.
After you’ve adjusted the button’s looks to your specifications, copy the code and go back to WordPress.
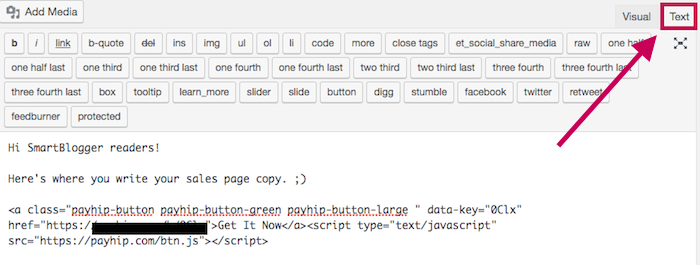
Click the Text tab in the upper right-hand corner of your content editor, and paste the button code where you want it to appear on your page:
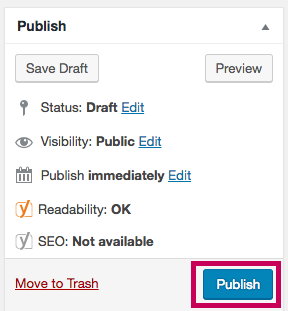
Now, publish the page and add it to your main menu.
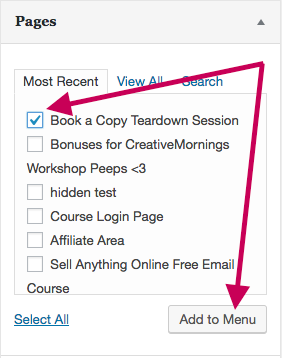
First, click “Publish” on the right-hand side of the page editor.
Then go to “Appearance” in the left-hand menu, and click on “Menus.”
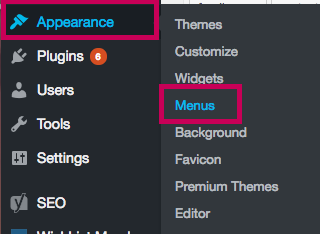
Then add a check in the box next to your new page, and click on “Add to Menu.”
And that’s it!
You’ve now got a coaching offer for sale. (Congratulations!)
With figuring out your offer and adding it to your website, you’ve already done most of the work.
But then you get the first booking for your first ever coaching call . . . and if you’re like most bloggers who like blogging because it means you can sit behind a screen and not be in the public eye 24/7, you start to get a little nervous. Maybe even sweat a bit.
And allll these insecurities start coming up:
Which is why it’s important to remember that you do have something special to offer. If you’re passionate enough to start a blog and write regularly on a topic, chances are you know more than at least 80% of people about that topic.
It’s also important to remember that when people pay for something, it means they’re putting their skin in the game and will be invested in your advice. They’re not expecting you to be perfect—all they need is your advice to get them to the next step.
And while some people will want to just talk and talk and talk about their problems, you’re the coach here, so you’ll need to rein in the conversation and keep it focused on the outcomes you want to deliver within that one-hour conversation.
With time, you’ll become more practiced and discover what works best for you as you do more coaching sessions. But to start out, here’s a great timeline to guide the conversation that keeps everything neatly inside of one hour, and makes sure your client feels heard.
| Talking Point and Time Estimate | Time Elapsed |
| 3-5 minutes: Exchange hellos and small talk, and ask client to talk about their pain point. | 5 minutes |
| 5-7 minutes: Client talks about their pain point and you ask clarifying questions to make sure you’re on the same page. | 10-15 minutes |
| 5 minutes: Pick out three major areas to talk about and run them by client to see if they’re on board. You’ll allocate 15 minutes to each point, and can move on to more at the end if you have time left over. This serves as your 45-minute warning. | 15 minutes |
| 15 minutes: Talk about and give advice on Point 1. Make sure it’s conversational and that you’re asking the client questions like, “Does that make sense?” and “Does this seem doable?” to keep them engaged. | 30 minutes |
| Give 30-minute warning and transition to Point 2. | 30 minutes |
| 15 minutes: Talk about and give advice on Point 2. Make sure it’s conversational and that you’re asking the client questions like, “Does that make sense?” and “Does this seem doable?” to keep them engaged. | 45 minutes |
| Give 45-minute warning and transition to Point 3 | 45 minutes |
| 10-12 minutes: Talk about Point 3. (It’s usually the least crucial of all three points.) Again, keep things conversational. | 55 minutes |
| Give a 3-5 minute warning and ask if they have other questions you can answer. | 55 minutes |
| 5 minutes: Quickly answer questions or, if the client doesn’t have any questions, give a recap of the points you went over and talk about how you’ll follow up after the call. | 60 minutes |
Honestly, I know 15 minutes might sound like a lot of time to talk about one point, but it’ll go surprisingly quickly. You’ve got a lot of knowledge in your head about your particular topic area, and 99% of the time, clients who pay to get on the phone with you will eat it up and ask all sorts of questions.
If you find yourself in the position of a client having a million more questions and you’re at the 58-minute mark, try not to worry too much. Politely tell them you’ve only got time for one more question, that you’ll follow up with a list of notes on what you’ve gone over, and that if they feel like jumping on another 30-minute or 60-minute call in the next week or so, they can.
Using the reason of having another call lined up after this client is a great exit, even if you don’t actually have one. And honestly, you’ll find most people will have 100% respect for the boundaries you set.
After the call, as I’ve hinted above, you’ll want to do a brief follow-up with the client as a way to officially close things out and give them the information covered on the call as a point of reference.
Most people will take their own notes, but the follow-up email is always a nice touch and increases their feelings of loyalty toward you as someone who has their best interests at heart.
But in addition to the customer support side of after-call follow-up, you’ll want to take the opportunity to jot down what you learned during the call for your own purposes.
It doesn’t have to take more than 5-10 minutes, but writing down the following things will go a long way toward making the most of these calls for a better blog and blog-based business:
Equipped with this information, you’ll be able to make your blog more interesting and engaging for people in your target audience, and to validate the ideas you have for products that you hope to make money on in the long run.
Coaching is the perfect way to connect with your audience and see what makes them tick.
I’ve seen it in my own business: Since I started coaching, I’ve become more relevant to my audience and I’ve strengthened my business at least ten-fold.
I can write content that I know is interesting to them, I know what they’re struggling with, and I know what kind of products to put together so I can generate income from my blog.
And while none of this will happen overnight, you’ll see results from your blog much faster if you coach people in your audience early … even if you only get a few clients here and there.
So create your offer, set up your coaching business, and make your first coaching calls.
It’s never too early to start.

You’re skeptical.
You hear about bloggers who make money while they sleep — bloggers who take epic vacations or spend all their time with their families, and at the end of each month, they still have money coming in.
It sounds too good to be true. Especially when you’re slaving away every day and can barely make ends meet.
But it’s not just an urban legend. Once your blog draws a steady stream of traffic, you can turn it into a passive income machine. You can make money on autopilot and you won’t have to resort to any shady tactics to do so.
Check out these seven totally legitimate ways to make passive income from your blog.
Sherry, the Canadian blogger behind the blog Save Spend Splurge, found herself in $60,000 worth of debt after college.
This is a predicament shared by many millennials today. But instead of paying her debt back slowly with minimum payments, Sherry created a budgeting template in Excel that helped her get that entire debt load off of her back just 18 months later.
After starting her personal finance blog, Sherry realized something. If her Excel template was powerful enough to clear her debt in 18 months, it could help her readers too.
So she called it “the Budgeting Tool” and listed it for sale on her blog for $50:

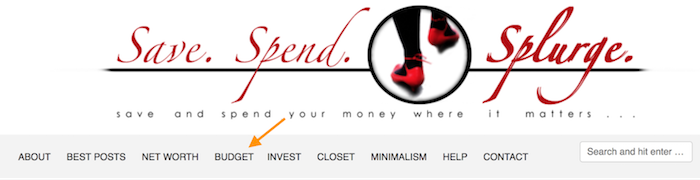
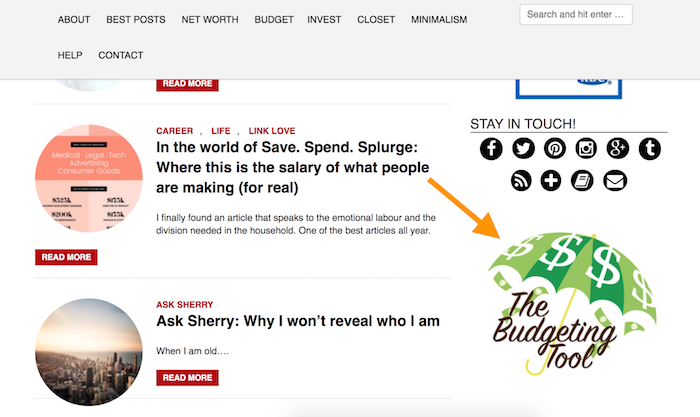
She then made it easy to find by adding a link in her top menu and sidebar:
You may have created some resources for your personal use that would be useful for your readers, too. In fact, maybe you’ve created a resource that they’d be happy to pay for.
For example, if you blog about weddings and you’ve created your own invitations, you can sell them as printables. If you blog about graphic design, you have probably created Photoshop templates that you could sell. Or if you’re a travel blogger, you could sell bag-packing checklists or trip-planning worksheets.
Whatever niche you’re in, chances are there’s plenty of opportunity for selling such resources and templates.
When you think of selling physical products on your blog, it might seem like a nightmare. You imagine yourself in your living room, surrounded by products and empty boxes, with dozens of printed-out orders in hand, and you’re trying to make sure everybody gets exactly what they ordered.
But these days, you can sell products without needing to store, package, and send them yourself. You can use dropshipping companies that do it for you.
Dropshipping is a method of ecommerce that lets you transmit orders directly to the supplier. The supplier will then take care of the packaging and ship the product directly to the customer.
You don’t have to lift a finger, your spare bedroom doesn’t have to turn into a stockroom, and the USPS guy won’t come knocking on your door every day.
Benny Hsu from Get Busy Living sells his own t-shirts through one of these companies:
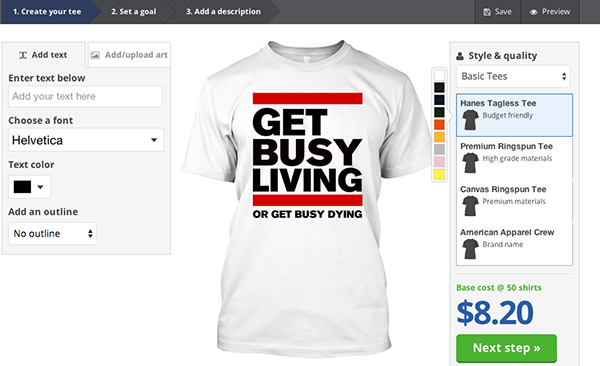
Benny uses Teespring, a shirt and apparel dropshipping and manufacturing company that allows you to design your own products and sell them via its platform.
He earned $100,000 in five months through selling t-shirts. He tested several designs and after he found which ones sold well, he could sit back and watch the sales come in.
Offering a physical product on your blog doesn’t have to mean constant inventory management. It can mean dropshipping and selling your products passively for years to come.
If you’re interested in pursuing dropshipping, you can find a list of dropshipping companies here.
Given that you’re a blogger, I assume you love writing. So publishing an ebook is a perfect way to generate passive income. It offers a way to get recurring payments for the words you write down.
This is what Tracy Gillett does on her blog, Raised Good:
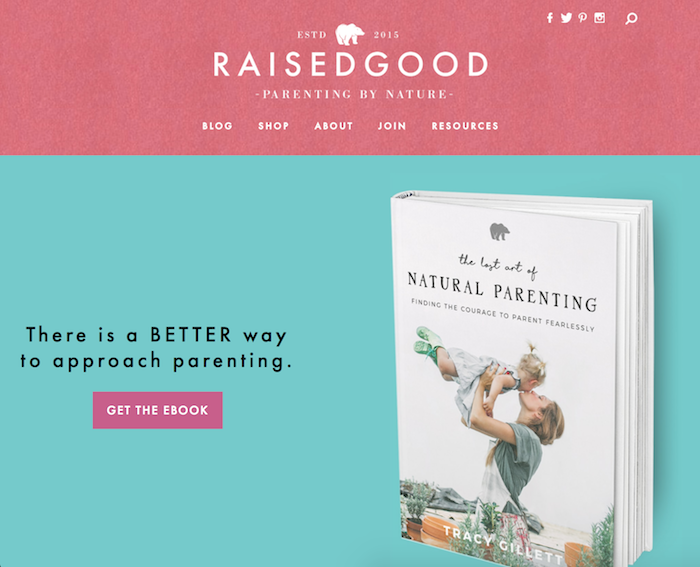
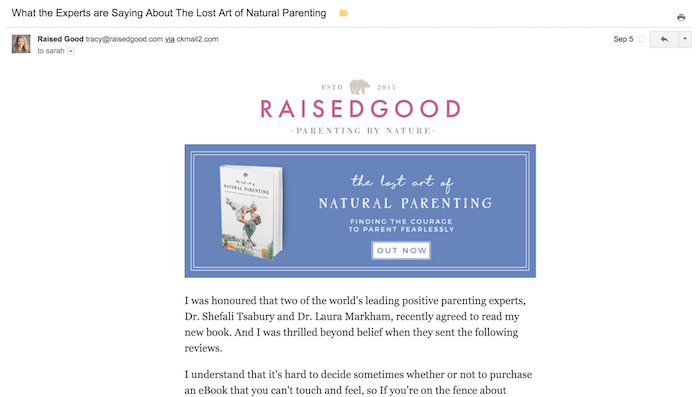
She sells The Lost Art of Natural Parenting for $17. She’s set up a sales page on her blog, and also sells it to her subscribers through an email autoresponder series, allowing her to sell her ebook on autopilot:
The beauty of publishing ebooks is that you can offer them to your readers as a digital download, wiping your hands clean of having to handle and ship a physical book. Once you write it, it can truly be passive.
Having written the 129-page ebook in 2016, Tracy can now earn money from selling it for years to come, no matter whether she’s traveling, working in her day job, exploring, or spending time with her son.
You probably use several products related to your blog niche, right?
I might even guess that you love some of those products. If you nodded yes, then you can probably reap the benefits of this “holy grail” of passive blogging income: affiliate marketing.
Leanne Vogel, a nutrition educator and the blogger behind the keto blog Healthful Pursuit, uses many supplements in her own diet. So when she’s writing blog posts or recording podcast episodes, mentioning those products is natural.
When one of her audience members buys from her referral link, she makes an affiliate commission. And that, my friends, is “passive income”: referring your audience to products you know and love and getting paid for it, too.
For example, check out how Leanne places an affiliate link for Perfect Keto products in her blog post:
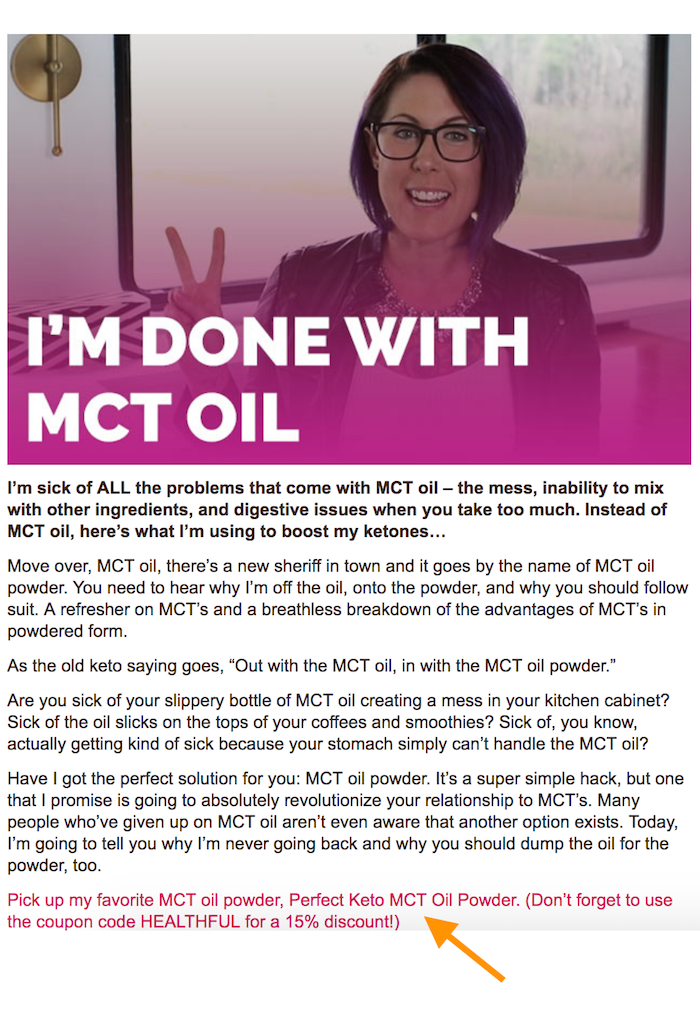
She incorporated the link naturally within an article, giving her audience a discount just for them.
Leanne gets a commission for referring sales to Perfect Keto, and her audience finds out about a product that she loves and uses. It’s a win-win.
Your audience wants to develop skills that will help them fulfill their goals. You can get paid teaching them those skills. And you don’t even have to do it in person. (Wouldn’t be passive if you did, now would it?)
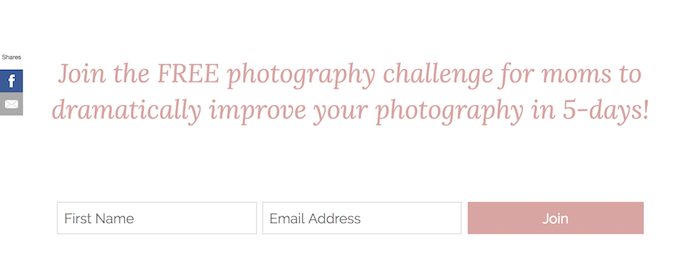
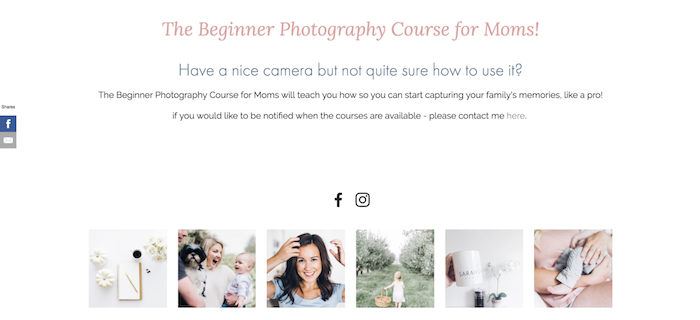
Blogger Sarah Lambert writes a photography blog for moms, and she gets to do just that by selling online courses to her audience, teaching them how to do what she loves to do.
She first offers a free email challenge to grow her email list and prove the value of her courses:
She then sells a course that teaches her audience how to use their cameras to take great pictures of their children.
All you need is the course content, and a course-creation platform like Teachable or ClickFunnels.
You can sell the courses on your website like Sarah does, through your email list, and by mentioning it in articles where it fits.
This can make you a lot of money as courses can sell for high dollar amounts. Many bloggers charge anywhere from $100 to $1,000 for their courses. When it comes to pricing your course, you should keep this in mind:
What can you teach your readers that would add value to their lives?
When Pat Flynn from Smart Passive Income launched his podcast, he couldn’t find the perfect podcast player. He wanted one that looked good on his site, but also had the capabilities that the established podcast players had.
Instead of waiting for somebody else to make a better program, he hired people to create the player he wanted: The Smart Podcast Player.
Pat sells the podcast player on his blog and in his online courses about podcasting.
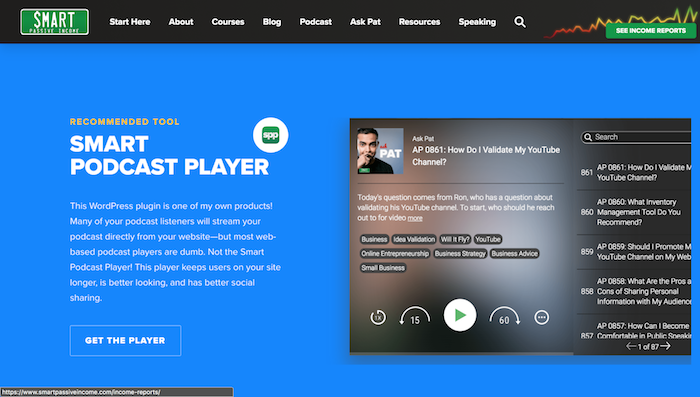
He reports earning over $14,000 from the player in September 2017:

Not too shabby, right?
Ever use software and wish it were better? Does your audience desperately need an app that doesn’t even exist yet? Consider making it (of having it made) yourself.
Admittedly, this requires you to either be a developer or be able to hire one. But if you can swing it, you can profit.
In 2014, I began to enact dozens of tiny changes in my life (like waking up earlier, making time for fitness every day, and journaling). I blogged about many of these changes as I saw them make a positive impact on my life.
As these small changes turned into habits, I realized something:
Every small, positive change we make in our lives pays compound interest.
Enter The Unsettle Challenge: one of the ways my blog makes passive income.
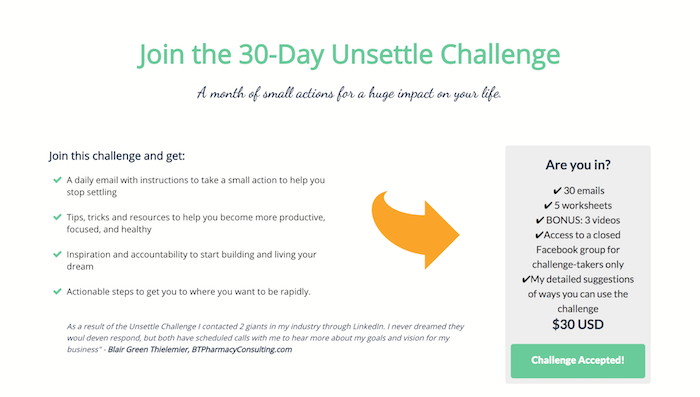
The Unsettle Challenge is a paid email series that delivers one email a day for 30 days, each challenging the reader to make a positive change in their lives, like eliminate wasted time or drink a green smoothie every day.
I charge $30 for it — one dollar for each day of the challenge — and sell it to my subscribers through an automated email:
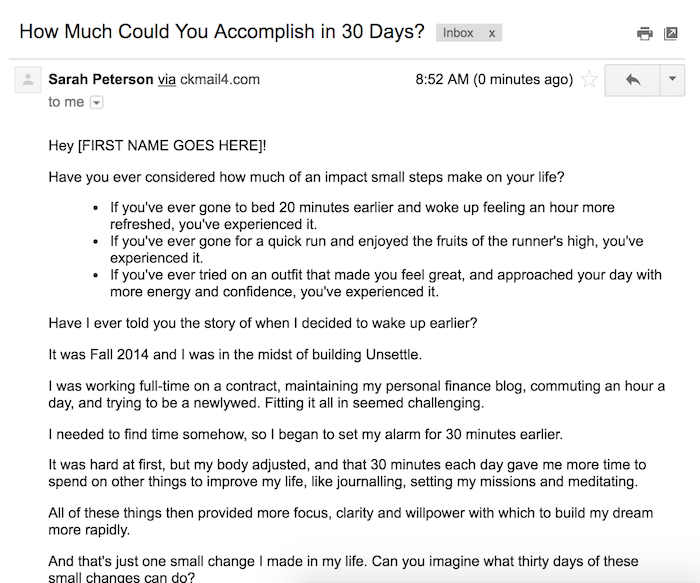
The challenge still sells, even two years after I launched it.
And I haven’t touched the sales email, the challenge, or the sales page at all since it launched.
In an online world full of free challenges, you might doubt that you can charge for a challenge, but I’m proof that you can — as long as the challenge offers value.
You started blogging because you love your topic.
You want to share your passion with the world, add value to your reader’s lives, and do what you love.
But you also want to earn a bit of money from your blog. And what better way to do that than to earn passive income — so you can do what professional bloggers are known for: travel the world, make money at home in your pajamas, and spend more time with your family.
The good news: There are plenty of opportunities to earn passive income from your blog, from affiliate marketing to creating your own physical products. You just have to figure out which method suits you best.